Category Archives: Tips, Tricks and Tweaks

Want to know how to make the most out of your Windows 7 system?
Here we share the things we have learned for what to do (and what not to do) to make Windows 7 perform at its best.

Use SP Cleanup Tool to Pare Down Winsxs folder, Reduce Windows Footprint

If your Windows 7 install has been around long enough, it will pick up various bits and pieces of leftover install information. The Windows Deployment Image Servicing and Management (DISM) tool includes a plethora of command line options that work on a running operating system (in addition to its more common use in setting up images for automated Windows deployments). For use on an active OS, however, your best reference is to start up cmd.exe using “Run as administrator” then type dism /online /? at the command line for a complete listing of commands and options.

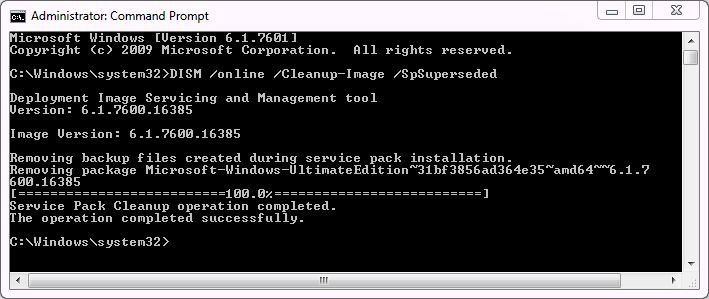
In particular the command DISM /online /cleanup-image /spsuperseded is a handy one to know, because it gets rid of superseded install packages left in the wake of a service pack or other major update. It was designed as a post-SP-install cleanup tool, but I’ve run it on several systems that were built from the Windows SP1 slipstream install media, and it still found elements to remove from the installed image, as shown in this screen capture:

DISM removed two packages from my post-SP1 slipstreamed Windows 7 Ultimate installation

This recovered about 3 GB of disk space on my primary production machine — a welcome capability on the 120 GB SSD drive that I’m watching carefully to make sure it maintains at least 25% free disk space, to give the OS and applications room to breathe. On the other hand, if you run it on some systems, you’re more likely to see a result like this one, when DISM finds nothing to clean up on your behalf:

Nothing to clean up on my Lenovo T520 running Win7
Nothing to clean up on my Lenovo T520 running Win7

Still, it’s a useful post-SP-install trick to keep up your sleeve. Another SP for Windows 7 is pretty likely to appear around the same time that Microsoft ships Windows 8 (late October is when that should happen, say most pundits). If this doesn’t do your system any good now, it will surely come in handy after you install the next SP!

Facebooklinkedin
Facebooklinkedin

Disk2VHD Is Just What the Doctor Ordered for Machine Upgrades and Migrations

Anybody who’s followed my Windows experiences and commentary already knows I think the Sysinternals guys (Mark Russinovich and Bryce Cogswell, primarily, but also a host of others over the years) hung the moon when it comes to great tools and utilities. I was recently pondering how to get over the “What did I forget?” hump in finally upgrading my primary desktop from 4 to 12 GB of RAM, and thus also from Windows 7 Ultimate 32-bit to its 64-bit counterpart, when my research led me to their free tool named Disk2VHD.

Continue reading Disk2VHD Is Just What the Doctor Ordered for Machine Upgrades and Migrations

Facebooklinkedin
Facebooklinkedin

Great Product for Recycling 2.5″ Notebook Drives

In the past quarter, I’ve replaced the boot drives on my three primary notebook PCs with el-cheapo ($149) OCZ-3 Agility 120 GB SSD drives. In turn, that has left me with three 500 GB 2.5″ drives that I can still use, but no longer want for primary notebook HDs. That left me casting about for a solution to put these babies back to work at minimal expense with maximum results. Here’s what I found to meet my needs: a 5.25″ drive bay that accommodates four 2.5″ drives in the standard form factor, and supports both SAS (Serial-Attached SCSI) and SATA drives in a single, heavy-duty brushed aluminum enclosure. It’s available on Newegg for a modest $55, and on Amazon for $60. Here’s an introductory photo of the device, straight from the manufacturer’s Website:

Each of the drive sleds holds a standard 11mm 2.5" HD, or larger if you remove the sled top

Continue reading Great Product for Recycling 2.5″ Notebook Drives

Facebooklinkedin
Facebooklinkedin

A Tale of Three Notebook SSD Upgrades

OK, so I finally got my three production notebooks upgraded from conventional spinning hard disks to SSDs. All three of the source drives were 7,200 RPM SATA II drives: two from Seagate (one a Momentus plain-vanilla, the other a Momentus XT), along with a Hitachi 7K500 model. Of the three, the Momentus XT was far and away the fastest, but it couldn’t begin to match the OCZ Agility 3 SATA III 120GB drive that replaced it. I took advantage of a special sale to pick mine up for about $150 each on Newegg. Right now they’re priced at $155 with a $30 rebate to bring the price down to $125.

It took me a while to whittle these machines’ drives down to an acceptable level of disk space for the transfer. I recount this exercise in a couple of upcoming articles (one for InformIT.com, the other for InputCreatesOutput.com; no links yet but I’ll plug them in as they become available). Here’s a quick before-and-after snapshot:

Table 1: Notebook System Disk Holdings (Before & After)
Laptop Before Clean-up After Clean-up
HP dv6t 72.9 GB 52.8 GB
Dell M11X 48.2 GB 33.1 GB
Dell D620 35.4 GB 27.7 GB

I used the “Clone Disk” tool in Acronis True Image Home 2012 to transfer the contents of each conventional HD to its SSD replacement. Although the HP dv6t has the faster processor, the Dell M11X supports SATA 3 and outperforms the HP on I/O. All in all, the real proof for the value of the exercise comes from some before and after system timings, as shown in Table 2.

Table 2: Notebook System Timings (Before & After)
Timing Point Dell D620
(Before/After)
Dell M11X
(Before/After)
HP dv6t
(Before/After)
BIOS alert 00:03 / 00:03 00:03 / 00:03 00:08 / 00:07
Windows 7 Starting 00:11 / 00:07 00:32 / 00:19 00:12 / 00:09
Login Prompt 00:53 / 00:23 01:07 / 00:32 00:40 / 00:12
Desktop appears 01:20 / 00:35 01:44 / 00:42 01:13 / 00:19
Soluto value 01:49 / 00:42 02:26 / 00:42 02:22 / 01:02
Shutdown 00:20 / 00:07 00:18 / 00:06 00:22 / 00:10

Here’s what I take away from this recent adventure. First and foremost, you get the biggest win in performance after Windows starts loading and the systems start banging their drives for all they’re worth. Second, there’s a clear correlation between the I/O interface hardware and overall disk subsystem performance: the Dell D620 which has the oldest SATA controller, saw a jump from 5.9 to 6.9 in the Windows Experience value for the disk data transfer rate. The HP dv6t has a faster SATA II controller and leaped from 5.9 to 7.4, but the MX11 with its SATA III support surged from 5.9 to 7.9 (which is as high as Windows Experience values currently go). Third, some of the best benefits from SSD use come after the OS has booted: applications open and close much more quickly, and shutdown takes no more than half as long as it once did. I like it!

Facebooklinkedin
Facebooklinkedin

Another Nice System Drive Cleanup Maneuver: DriverStoreExplorer

In my continuing quest to find more and better ways to slim Windows 7 down on disk, so as to make the most of smaller, more affordable SSDs, I’ve come across another footprint reducing technique. Exploring space consumption with my favorite visual tool, WinDirStat, I observed that the Windows FileRepository directory (C:WindowsSystem32DriverStoreFileRepository) consumes a fair amount of space (2.2 GB after my initial assay, just under 1 GB after the clean-up I’m about to describe).

Continue reading Another Nice System Drive Cleanup Maneuver: DriverStoreExplorer

Facebooklinkedin
Facebooklinkedin

Be Prepared for Windows 8 Hyper-V Gotcha

I stumbled into an interesting potential “gotcha” as regards Windows 8 and its much-ballyhooed support for Hyper-V (see Steven Sinofsky’s Building Windows 8 blog entitled “Bringing Hyper-V to ‘Windows 8’” for more information) while researching an article on this topic for SearchWindowsEnterpriseDesktop.com this weekend. Although Microsoft has claimed in the past that Windows 8 will run on any PC that can run Windows 7, the same is most definitely NOT TRUE for Hyper-V support.

To run Hyper-V, a PC must not only run the 64-bit version of Windows 8, its CPU must also support a virtualization technology called Second Level Address Translation (aka SLAT) which, as Sinofsky’s blog states, “…is present in the current generation of 64-bit processors by Intel and AMD,” along with at least 4GB of RAM. Given the memory requirements for VMs, the 4 GB requirement is neither terribly surprising nor onerous. As it turns out, only the ix Intel processors (i3, i5, and i7) and Barcelona-model or later AMD processors (K10 or higher Opteron and Phenom CPUs) support SLAT.

You can check the status of your CPUs by downloading the latest version of Mark Russinovich’s coreinfo.exe utility from the Microsoft Sysinternals Web pages, then launching the utility from a command line launched with administrative privileges. If your CPU will run Windows 8 Hyper-V, you’ll see a display like this one:

Coreinfo -v produces virtualization info

The key entries in this display are the EPT (Extended Page Tables) for Intel processors, as shown in the preceding screenshot, and a value in the AMD processor output that may appear as NPT (Nested Page Tables) or RVI (Rapid Virtualization Indexing). Simply put, one of these values must be enabled for Windows 8 Hyper-V to work. What this also means is that even though I have some older quad-core systems that run Windows 7 just fine, with 12-16 GB of memory (and thus plenty able to host multiple VMs except for the SLAT requirement), I won’t be able to use those machines to host Hyper-V VMs when I start digging into Windows 8 later this month. All I can say is “Rats!”

Facebooklinkedin
Facebooklinkedin

More Noodling on System Drive Space-Saving: Move those VHDs!

On my continuing quest to save space on the C:/System/Boot drive on my Windows PCs — mostly so I can maximize the value and utility of my desire for SSD speed without forking over $500-600 for a sizable enough drive (256 GB or larger) so I don’t have to worry about saving space — I’ve kept on looking for small changes with big payoffs to keep drive space consumption down. Today, I came across a big one on my i7 test machine. It’s got Windows XP Mode installed, and by default Windows XP mode stores the file named Windows XP Mode.vhd in the C:Users<username>AppDataLocalMicrosoftWindows Virtual PC directory.

On my i7 test machine that vhd consumes 6.8 GB of disk space on a 120 GB Corsair Vertex 2 SSD. On that same machine, I’ve got two internal conventional drives: a 1.0 TB Samsung SpinPoint and a 1.5 TB Samsung SpinPoint, both with over 800 GB of disk space available. So I asked myself this question: “Why not move the VHD?” Sure, it’ll run slower than on an SSD, but I don’t use Windows XP mode frequently enough to justify 5% of its available disk space going to a single VHD file.

That raised the question: “How do I relocate the VHD file?” A quick Google search turned up a nice and very helpful post on social.technet.microsoft.com which provided the following instructions:

  1. Start up the VHD, then use the CTRL-ALT-DEL button to elect the “Shut down” option.
  2. Copy the file named Windows XP Mode.vhd from the C:Users… location to another hard disk
  3. Right-click the Windows XP Mode entry in Windows Virtual PC (or Server) and select the Settings option
  4. Use the Browse button association with Hard Disk 1 to point the program at the new location for the file (in my case that was F:VMsWindows XP Mode.vhd)
  5. Fire up Windows XP Mode to make sure everything is still working OK (worked for me, so hopefully it will also do likewise for you)

Bingo! 6.8 GB gone from the C: drive, and about 6% more free drive space for other uses on my SSD. I love it when little actions bring big wins!

Rashmi U R's posting on how to move the Windows XP VHD file

Rashmi U R’s posting on how to move the Windows XP VHD file (Click to Enlarge)

Facebooklinkedin
Facebooklinkedin

Nvidia: Why Do I Need 3D by Default?

OK, so I’m wondering out loud why nVidia finds it necessary to load my desktop up with the PhysX game accelerator, and various 3D drivers by default when I use none of those things. I know, I know: they want as many people as possible to use this “exiciting new technology.” But I’m about as likely to need PhysX as I am to go out and buy a set of 3-D glasses so I can revel in the glory that is 3D graphics for posting blogs, writing articles, and Tweeting here and there.

Bottom line impact on my system is about 1 GB of drivers, utilities, and consoles that I really don’t want, not because I don’t like or appreciate them, but simply because I don’t use them. I wish nVidia didn’t install all of these items by default but rather, made the selection process that the custom install offers accessible by default instead. Without PhysX, 3D drivers, and the nVidia control panel, Task Manager shows 3 nVidia related tasks (two instances of nvvsvc.exe, the nVidia Driver Helper Service, 3,156K and 1,760K, respectively, and NvXDSynx.exe, Nvidia User Experience Driver component, 3,660K ). With everything loaded without restraint, Task Manager shows 6 tasks that consume a total of 42.26 MB of RAM, as shown in this screen snippet:

Task Manager's nVidia tasks with default install

By just installing the nVidia device driver only (no Update, no PhysX, nothing 3D) memory consumption drops to 8.375 MB. Granted this wouldn’t do me any good if I played games or used applications that required PhysX (AFAIK, it’s a games only thing) or used 3-D. But I don’t. So a little trimming frees me up some system resources. But the numbers aren’t really that dramatic, not even on a 32-bit system with 4GB of RAM (3,326 M or 3.2 GB usable) installed. But shoot! It’s the principle of the thing…

Facebooklinkedin
Facebooklinkedin

Interesting tips and tweaks for PST file cleanup & optimization

OK, I admit it. I’m a little bit obsessive about maintaining maximum free space on the 80 GB putative (74.5 GB actual size) Intel X25-M SSD I use as the system drive for my production PC. In my never-ending quest to keep things pared down to the absolute minimum, I will occasionally resort to cleaning up and compressing the PST files associated with Outlook on that machine. To that end, I’ve already moved my Archive.pst file to another drive. But today, I got into compacting my PST files (and completely cleared out the default Archive.pst that Outlook manages to create on my C: system drive, whether I want it to or not), and learned some interesting stuff along the way.

Continue reading Interesting tips and tweaks for PST file cleanup & optimization

Facebooklinkedin
Facebooklinkedin

Is “If it ain’t broke…” worth heeding, even if it’s dumb luck?

Anybody who follows my system blog knows that my current production system is probably best described as temperamental. Since upgrading to Windows 7 in August of 2009, it’s been a heckofalot better than its previous life under Vista, to be sure, but I’ve had my share of ups and downs with this collection of hardware parts. Here’s a brief description of what’s going on under the hood in this particular box:


Ed’s Production Windows 7 PC
Case Antec 900
CPU Intel QX9650 (Yorkfield, 45 nm)
Memory 2 x 2GB SuperTalent DDR2-800 (5-5-5-18)
Graphics GeForce GTX 275
System HD Intel X25-M 80GB SSD
Other HDs SpinPoint 1.0 GB (7200 RPM)
Cooler Zalman CNPS 9500
PSU Gigabyte ODIN 800W
Optical drive Asus BC-1205PT Blu-ray

Over the past couple of years, I’ve had to deal with numerous instances of blue screens, application hangs, and strange Windows Explorer hangs. I’m also doing increasing work with virtual machines and have found that 4 GB of RAM just isn’t enough to permit me to be productive running regular apps with even one VM open. So I’ve been preparing to upgrade this system to x64 Windows 7 from the current 32-bit x86 version, as documented in my August 2, 2011 blog “Coming Soon (I Hope): Win7 32- to 64-bit Conversion.”

Here’s my problem, depicted in the form of the current Reliability Monitor for the past 20 days: this system has been completely trouble-free pretty much since I wrote the afore-cited blog. Not a single glitch, hitch, blip or hiccup in the interim.

Reliability monitor for August 6 thru August 24
(Click to enlarge)

Frankly, this puts me in a quandry: yeah, sure I do need the extra memory space that converting from 32- to 64-bit Windows 7 will confer thanks to the 8 GB of additional RAM I’ll install into the system to take it up to 12 GB. But I’m slammed with work right now, and it goes against my better instincts to start making major changes to my principal production system right now. I have a 12 GB i7-930 system up and  running already anyway, with a GTX 470 graphics card and an even faster Corsair Vertex 2 SSD for the system drive. I’m starting to think that maybe I should migrate to that system instead, and convert this box to test machine status when I upgrade to x64 Windows 7 and add the extra memory. But one thing’s for certain: I’m not doing anything major until the current onslaught of work tapers off a bit. I just don’t have time to make any production changes right now!

Facebooklinkedin
Facebooklinkedin