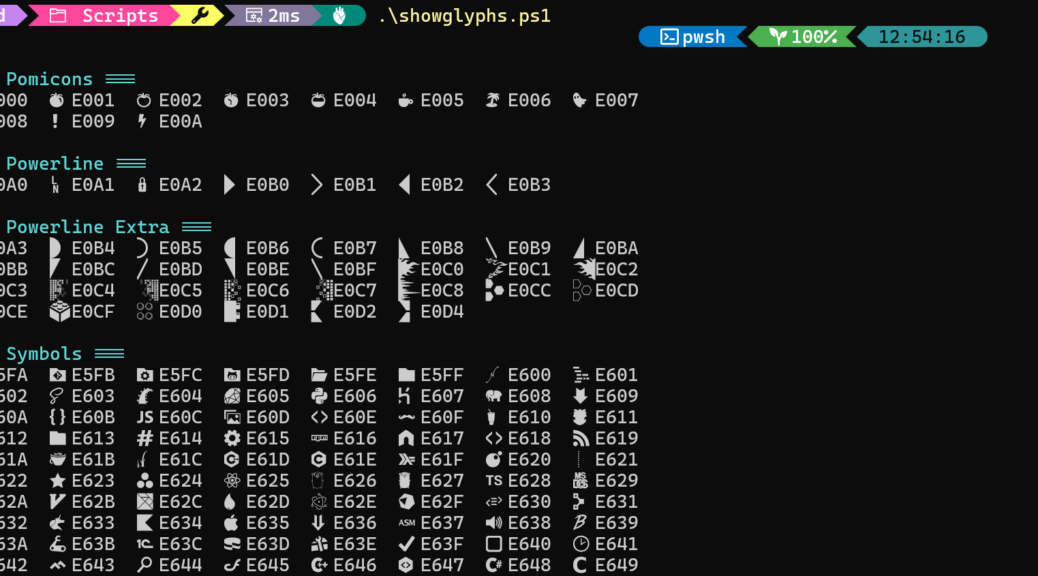
Nerd Fonts patch popular programming fonts with thousands of extra icons. These icons live in the Private Use Area (PUA) and other reserved Unicode blocks. Terminals that load Nerd Fonts gain instant access to logos, arrows, file-type icons, weather symbols, and power glyphs. Have you ever wondered exactly which glyphs your installed font contains? The Show-NerdFontGlyphs PowerShell function answers that question fast. It is the key to examining nerd font glyphs, in fact, up close and personal (see lead-in graphic).
Script for Examining Nerd Font Glyphs
The script defines one function: Show-NerdFontGlyphs. It loops through 13 named glyph ranges and renders each glyph alongside its hex code point. It also arranges the output in a configurable column grid. The default is eight columns wide. That width fits comfortably in most terminal windows. Run it, and in seconds you have a full visual catalog of every icon your font supports.
Each section prints a cyan header, making it easy to scan. Each row shows the rendered glyph followed by its four-digit hex address. That pairing is the key feature. Specifically, if you spot an icon you want, note its hex value. Then, reference it in PowerShell with [char]0xXXXX. For code points above U+FFFF, use [System.Char]::ConvertFromUtf32(0xXXXX) instead.
Unicode Ranges Covered
The script covers 13 glyph families. Here’s a quick guide to each one.
- Pomicons (U+E000 to U+E00A): This set holds 11 miscellaneous icons from legacy Powerline themes.
- Powerline (U+E0A0 to U+E0B3): These glyphs power the core Powerline separators and branch symbols used in prompt themes worldwide.
- Powerline Extra (U+E0A3 to U+E0D4, scattered): This range adds rounded, flame, and diagonal separator variants to extend the Powerline set.
- Symbols (U+E5FA to U+E6B2): These general-purpose glyphs include file-type icons and folder symbols.
- Devicons (U+E700 to U+E7C5): This section covers programming language and framework logos including Python, JavaScript, Git, and Docker.
- Font Awesome (U+F000 to U+F2E0): This classic set delivers social, UI, and media icons from Font Awesome 4.
- Font Awesome Extension (U+E200 to U+E2A9): These icons extend Font Awesome with additional symbols.
- Octicons (U+F400 to U+F4A8): GitHub Octicons cover pull requests, issues, branches, and repository actions.
- Font Logos (U+F300 to U+F372): This range holds OS and distribution logos including Linux distros, BSD variants, and Apple.
- Power Symbols (U+23FB to U+2B58): These glyphs represent standby, power-on, sleep, and toggle functions from the Miscellaneous Technical block.
- Weather Icons (U+E300 to U+E3EB): This section delivers sun, cloud, rain, snow, wind, and forecast glyphs.
- Material Design (U+F0000 to U+F0200, first 512 only): These icons come from Supplementary Private Use Area-A and represent a subset of the Material Design set.
- Codicons (U+EA60 to U+EBEB): Visual Studio Code uses these icons for debugging, source control, and editor UI elements.
Spotlight on U+E62A: Win11 Logo
One glyph deserves special attention: U+E62A. It sits inside the Symbols range (U+E5FA to U+E6B2) and renders as the four-pane Windows 11 logo. Furthermore, it behaves as a double-width glyph. In other words, it occupies two terminal columns rather than one. That property makes it ideal for building large logo art in FastFetch or other terminal info tools.
You reference it in PowerShell with [char]0xE62A. In a Nerd Font terminal, that expression produces the Windows logo glyph directly. Yesterday’s post on this site shows how to build a custom 8×8 FastFetch logo grid in Windows blue using this glyph.
Running the Script
Save the function to showglyphs.ps1. Next, dot-source it in your PowerShell 7 session and call it:
.\showglyphs.ps1

Show-NerdFontGlyphs
You can also adjust -Columns to fit your terminal width. Narrower windows work better with -Columns 4 or -Columns 6. The function handles code points above U+FFFF using [System.Char]::ConvertFromUtf32. As a result, it does not throw errors on supplementary characters.
Download the Script
Download the complete showglyphs.ps1 script directly from this post. Save it to your PowerShell scripts folder and dot-source it in your profile or on demand. Finally, pair it with a Nerd Font in Windows Terminal for the best results. CaskaydiaCove Nerd Font and JetBrainsMono Nerd Font are both excellent choices.
I wouldn’t have found the Win11 logo without this nifty little tool. Try it yourself, and be amazed at all the icon-like images that nerd fonts can offer. They’re amazing!

