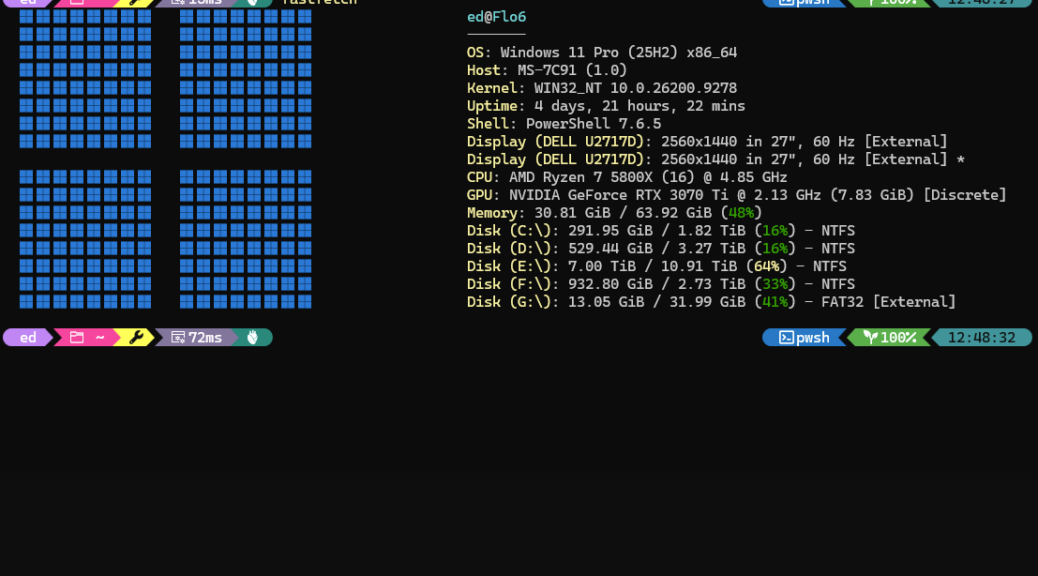
FastFetch is a lightning-fast system information tool that runs in the terminal and displays your OS, CPU, GPU, memory, and disk details in a clean two-column layout. It ships with built-in text-art logos for major OSes. Alas, the default Windows logo in FastFetch is a modest ASCII rendering using the letter “l”. This post shows you how to replace it with the Windows 11 Nerd Font glyph. I call it the WinLogo glyph myself. And indeed, using the winlogo glyph in FastFetch is easy thanks to two short PowerShell scripts.
How Easy Is Using WinLogo Glyph in FastFetch?
Nerd Fonts are patched programming fonts that include hundreds of extra icons in their Private Use Area. The Windows 11 logo lives at Unicode code point U+E62A. When your terminal uses a Nerd Font such as CaskaydiaCove Nerd Font or JetBrainsMono Nerd Font, that code point renders as the familiar four-pane Windows 11 logo.
However, each U+E62A glyph is double-width. In other words, it occupies two terminal columns rather than one. That behavior matters when you configure FastFetch’s width parameter, as I’ll show later on. Knowing this upfront saves you trial and error later.
How FastFetch Reads a Custom Logo File
FastFetch supports a logo type called file. With this type, FastFetch reads a plain-text file and renders its contents to the left of your system information panel. Inside that file, color tokens such as $1 map to ANSI colors you define in config.jsonc. FastFetch re-applies the color at the start of each logo line, so any segment that needs consistent coloring must carry its own $1 re-arm token.
The design I used is a 2×2 arrangement of four 8×8 glyph blocks. Together, they form a large Windows logo built from smaller Windows logos. Each row contains two groups of eight glyphs separated by four spaces, with a single space between individual glyphs inside each group. A single blank line divides the top two blocks from the bottom two, giving the overall shape a clean four-pane look.
The key trick: after the left block and the four-space gap, FastFetch can silently drop the active color. Adding a second $1 token directly before the right block re-arms the color and keeps both sides uniformly blue across all 17 lines of the file. I figured this out by experiment, but I’m happy to share this “secret” openly.
Example 1: Writing the 8×8 Logo File
Run the following script in PowerShell 7. It writes the logo file with UTF-8 no-BOM encoding, which FastFetch requires to interpret this glyph correctly.
Example 1: win11logo.txt generator
$g = [char]0xE62A

$b = "$g $g $g $g $g $g $g $g"

$r = '$1 ' + $b + ' $1' + $b + ' '

$gap = '$1 ' + (' ' * 28)

$logo = ($r,$r,$r,$r,$r,$r,$r,$r,$gap,$r,$r,$r,$r,$r,$r,$r,$r) -join [char]10

[System.IO.File]::WriteAllText(

"$env:USERPROFILE\.config\fastfetch\win11logo.txt",

$logo,

[System.Text.UTF8Encoding]::new($false)

)
Note: the foregoing text is formatted for cut’n’paste use. Parsing it for human readability doesn’t work well in WordPress. Sorry! If you don’t have a fastfetch directory set up, start with this ahead of the previous commands: New-Item -ItemType Directory -Force "$env:USERPROFILE\.config\fastfetch" | Out-Null.
The [char]0xE62A expression converts the Unicode code point to an actual glyph character at runtime. The backtick before each $1 token tells PowerShell to treat the dollar sign as a literal character rather than the start of a variable name. The $gap variable fills the blank middle row with enough spaces so that FastFetch won’t collapse it.
Example 2: Write the FastFetch Config File
With the logo file in place, the next step is updating config.jsonc. The width value tells FastFetch how many columns to reserve for the logo panel. FastFetch counts each glyph as one character, not two display columns. Therefore, set width to the character count of the longest line in the logo file, not to the visual column count. For this 8×8 layout, that value is 38.
The height value is 17, matching the total line count of the logo file: eight rows, one blank gap row, and eight more rows. The color key maps $1 to Windows blue via the 24-bit ANSI code 38;2;0;120;212. A trailing space at the end of each logo row ensures the rightmost glyph renders in blue rather than in the terminal’s default foreground color.
Example 2: config.json generator
$lp = ("$env:USERPROFILE\.config\fastfetch\win11logo.txt") -replace '\\','/'

('{"logo":{"source":"' + $lp + '","type":"file","color":{"1":"38;2;0;120;212"},"width":38,"height":17,"padding":{"top":0,"left":1,"right":1}},"modules":["title","separator","os","host","kernel","uptime","packages","shell","display","cpu","gpu","memory","disk","battery"]}') | Set-Content "$env:USERPROFILE\.config\fastfetch\config.jsonc" -Encoding utf8NoBOM
Tips and Gotchas
A few points are worth keeping in mind before you run these scripts.
First, the default font must be a Nerd Font. The U+E62A glyph renders as a plain box or question mark in any non-patched font. CaskaydiaCove Nerd Font, JetBrainsMono Nerd Font, and FiraCode Nerd Font are all reliable choices that include the Windows logo glyph.
Second, width tuning requires some trial and error. If the right-side block renders in white instead of blue, increase width by two or three. If the gap between the logo and the info panel is too wide, decrease width by the same amount. The trailing space in each logo row prevents the rightmost glyph from getting clipped by the color boundary.
Third, always use Set-Content with -Encoding utf8NoBOM for the config file and [System.IO.File]::WriteAllText with an explicit UTF8Encoding $false object for the logo file. PowerShell’s default encoding on Windows adds a byte-order mark that FastFetch does not handle gracefully when reading Nerd Font glyphs. I learned this the hard way, so you don’t have to!
Enjoying the Fruits of Your Labor
After both scripts run, type fastfetch at the prompt. You should see a bold, blue 4×4 Windows logo grid on the left, assembled from 256 individual Windows 11 glyphs, flanking a full system information panel on the right. The result is a visually striking terminal greeting that is entirely Windows-native in spirit and thoroughly custom in execution.
The WinLogo glyph in FastFetch is a small but satisfying way to put your personal stamp on your PowerShell environment. If you tweak the grid size or colors, the same two-script approach scales to any N x N layout you prefer.
Here in Windows-World, I get my jollies where I can find them. Today, I found them using a Windows 11 logo glyph for my OS logo in FastFetch. Where will my jollies come tomorrow?

