Category Archives: Cool Tools

Copilot Goes General in Beta Build 22631.2129

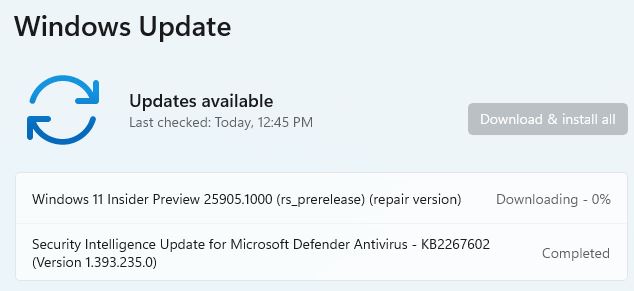
It’s heeeeeere! With yesterday’s release, Copilot goes general in Beta Build 22631.2129. I wondered what the new left-hand icon on the notification bar was for. And indeed, it’s a reduced size version of the app icon that appears in the lead-in graphic above. That’s one mystery quickly resolved, at least. But there’s a lot to like about Copilot so buckle up!

If Copilot Goes General in Beta Build 22631.2129, Then?

The WinKey+C combination also calls up Copilot which looks (and acts) pretty much exactly the same as the Bing ChatGPT pane in MS Edge. Indeed, when I ask it how to clear my search history, it tells me to go to the Bin Search history page and clear my history. This works, but requires a page refresh to clear things up. Fascinating!

Copilot Goes General in Beta Build 22631.2129.example

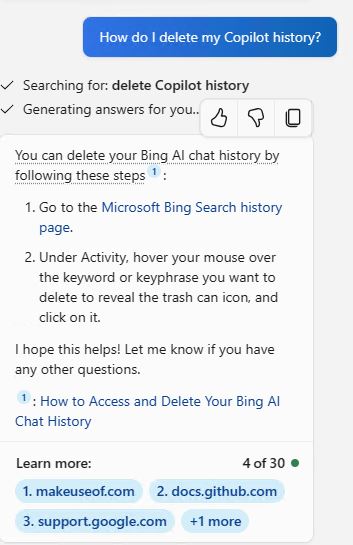
Under the hood, Bing Chat and Copilot share the same search history. Clearing the former also clears the latter.

Ride that Hobby Horse!!!

This heading explains what I plan to keep doing extensively and heavily in the days and weeks ahead. I’ve been waiting for MS to turn the lens of AI onto the OS and apps for a long time now. So far, it’s been pretty darn helpful even as I’m figuring out how best to use it. I hope they’ll also make best practices, tips and recommendations available on that very topic. But I plan on giving it — and myself — a strenuous workout as I get to know this new and welcome addition to Windows 11. Stay tuned, and I’ll keep you posted.

Note Added ~4:30 PM Same Day

I wrote a reasonably technical article on SuperMicro GPU servers built around NVIDIA GPUs and supporting network technologies for Remote Direct Memory Access (RDMA) today. Copilot proved pretty darn helpful in running down some nit-pick details about speeds and feed for NVLink, InfiniBand, and high-speed Ethernet. Very, very interesting!

Facebooklinkedin
Facebooklinkedin

PowerToys Sources: WinGet & MSStore

I saw yesterday on Twitter (X?) that PowerToys version  v.0.72.0 dropped. So I started banging on WinGet to upgrade me. It’s been at least 20 hours since that announcement, but WinGet still has no manifest for the new version. Indeed, the lead-in graphic shows v.0.71.0 as current. But there are two PowerToys Sources: WinGet & MSStore. And sure enough, installing the Store version brought one of my Lenovo X380 ThinkPads up to the latest iteration. This features in the lead-in graphic as well. The second WinGet list PowerToys command shows the current version installed — with a WinGet source, no less — after I downloaded and installed the latest version from the MS Store. Go figure!

Why Two PowerToys Sources: WinGet & MSStore?

The answer to the preceding query depends on how organizations do updates internally. Those who let WU and the MS Store handle things should choose the Microsoft Store version of MS apps when they can. This will automatically handle things on its own. But those who control updates will find WinGet invaluable. It makes a great focus for automation via PowerShell scripts as and when their update windows open.

Does that mean one or the other source for updates is better? Not at all. But today, it looks like the updates through the MS Store track new releases faster than WinGet does — for PowerToys, at least. I’m also interested that even though my update comes from the store, it shows WinGet as its source. But as long as it’s updated quickly and correctly, that’s OK.

Facebooklinkedin
Facebooklinkedin

New Explorer Address Bar Is Too Spread Out

In working with the new-look File Explorer in the Beta Channel Insider Preview, I’ve come to a conclusion. It stands as the title for this blog post — namely, this: the new Explorer Address Bar is too spread out. IMO, anyway. Take a look at the lead-in graphic to see what I mean (new address bar top, old address bar bottom).

Why Say: New Explorer Address Bar Is Too Spread Out

The top of the image shows the address bar consuming about 3.8″ of the total 8.5″ display on-screen. By contrast, the bottom shows it consuming 3.125″. That’s a 21.6% bump in on screen size, most of which comes from wider spacing between path elements (and the > symbol that replaces the \ in a fully-formed directory path). Here are the paths for the two contrasting folders themselves:


new-style: C:\Utils\PowerPlans
old-style: F:\Nirlauncher\NirSoft\x64

This observed, the text displayed inside the address bar for File Explorer for each version is a little different, as you can confirm by inspection:

new-style: This PC > Local Disk (C:) > Utils > PowerPlans
old-style: This PC > OCZ3-120 (F:) > Nirlauncher > Nirsoft > x64

The upper display consumes more screen space than the lower even though it’s shorter (46 characters in the upper line; 53 on the lower, counting each space as a single character). Thus, it’s even more spread out than the visuals show by direct comparison. Because the upper string is 15% shorter, the expansion comes to roughly 40% (multiply 1.15  by 1.216).

Is Brevity the Soul of Wit?

Methinks that a more compact address bar makes it easier — and faster — to consume its contents. I’d urge MS to offer a compact version of the address bar as a tweak in future releases. If they don’t, somebody will probably do so in an add-on tool (e.g. WinAero Tweaker). I guess we’ll have to wait and see what happens, perhaps in the upcoming 23H2 version of Windows 11. To that end, I hope somebody at MS is listening…

Note Added August 3

One person who read this post suggested that this spacing is designed to make touch access to the address bar easier. I buy the notion that added spacing makes touch more effective. But I still think MS should add a “compact address bar” option to its File Explorer controls so that those not using touch can elect a more condensed presentation if they want it. ‘Nuff said…

Facebooklinkedin
Facebooklinkedin

After OOO Upgrade Whirl Resumes

OK, then. We rolled back into the garage a little after 5 PM last night. We spent 4 glorious days in an around Marfa, TX. It’s an odd but charming hipster haven in the Big Bend region. This morning, I’m surveying the state of my slightly reduced PC fleet after my absence. I’m down to 9 machines right now, having returned a couple of loaners to Lenovo in hopes of some new review units in return. After OOO upgrade whirl resumes with a vengeance as I catch up on what I missed while gone.

Reporting on: after OOO Upgrade Whirl Resumes

Across my various PCs, I saw some auto-activity in Update history while I was gone. But as I worked with my PCs, each of them needed somewhere between half-a-dozen and ten upgrades/updates to catch up to the leading edge. In general, WinGet accounted for one to three of those items, WU for about the same, and SUMo for the rest.

Interestingly, Strawberry Perl had failed to update in WinGet and inside WingetUI just before I left town. I’d resolved to fix that this morning, but it seems to have fixed itself. WinGet did the upgrade job on its own with nary a hiccup nor error message (see lead-in graphic).

Across the fleet, here are the apps and applications I needed to update upon my return to “active duty” (in alphabetical order): Firefox, Driver Booster, Intel ARC Control, OhMyPosh,  Strawberry Perl, and Zoom. Given how long I was OOO (out of the office) I’d expected more. But hey, if I can take a break from the grind, so can everybody else, Cheers: it was fun to be gone, but it’s good to be back!

Facebooklinkedin
Facebooklinkedin

Introducing Microsoft PC Manager

Last Friday, I learned about a new Beta Windows utility from Microsoft called “PC Manager.” It’s available for download and use right now on both Windows 10 and 11. There’s just one problem: I couldn’t get it to install from the download for either OS. But since I’m introducing Microsoft PC Manager here and now, you know I’ve figured out a workaround. Yep: there’s a Winget package for this tool, and it installs through that approach just fine.

Still Introducing Microsoft PC Manager, Despite Installer Fail

If you run the download file named MSPCManagerSetup.exe it simply hangs, even when you agree to its terms and conditions. It just sits there, doing nothing, like so:

Introducing Microsoft PC Manager.install-hang

Even after agreeing to the terms, the installer presents no option to actually install the tool. Stuck!

I figured there might be a winget package manifest for this tool, seeing as how it’s a Microsoft thing. I was right. It took a bit of poking around, but I eventually hit paydirt on the string “PCManager.” Here’s a screencap with the right install syntax (and a successful installation).

Winget install Microsoft.PCManager does the trick!

Again: Introducing MS PC Manager

Here’s what the startup window from the application looks like. It provides information into PC health, storage, processes and startup apps, as well as cleanup and security stuff.

Introducing Microsoft PC Manager.program-running

OK then: here’s the home window for the Microsoft PC Manager (Beta) utility.

Health check takes a couple of minutes to run, and found excess files and baggage, as well as numerous startup items to cancel out. Storage Manger offers options for deep cleanup, large file management, app management and storage sense. Deep cleanup found and removed another 3.6 GB of “stuff” on my PC; large files created a single-pane display of all files over 100 MB on my system (you can set thresholds at 10, 50 and 100 MB, and 1 GB: pretty handy). Manage apps simply moves you to Settings → Apps → Apps & features, where you can review and manage what you’ve got. Storage Sense does likewise for Settings → System → Storage → Configure Storage Sense or run it now. All pretty handy, and worth fooling around with. Check it out!

In a future blog post, I’ll dig further into the Security button at the lower right. It has at least one interesting capability that I’ll also be writing about in an updated story for ComputerWorld soon (I hope).

Facebooklinkedin
Facebooklinkedin

Dissecting Winget Logs Shows Root Causes

Hmmmm. I just did something risky, or perhaps dumb on my production PC. You can see the evidence in the lead-in graphic, a PowerShell session that shows an issue (in red, at bottom) with the installer hash for a Google Chrome update. What you can’t see is that I was already updating Chrome inside Chrome itself while this was happening. The installer changes when a new version is installed. Fortunately, dissecting Winget logs shows root causes, so that’s what I did next. It was more illuminating than the error message, for sure…

How Dissecting Winget Logs Shows Root Causes

First, some background on Winget logs. You can find out more about them (and related troubleshooting stuff) in the MS Learn article “Debugging and troubleshooting issues with the winget tool.” It also gives you a huge honkin path where the log files reside — namely:

%LOCALAPPDATA%\Packages\Microsoft.DesktopAppInstaller_8wekyb3d8bbwe\LocalState\DiagOutputDir

But, rather than grab and use this, I simply told Voidtools Everything to show me all instances of the final directory name DiagOutputDir. That got me there a whole lot faster!

Once into the logfile named WinGet-2023-07-21-10-59-05.148.log I jumped to the bottom to see how it mentioned Chrome. Here’s the tail end of that log from 11:00:09 to 11:00:14.


2023-07-21 11:00:09.043 [CLI ] Generated temp download path: C:\Users\etitt\AppData\Local\Temp\WinGet\Google.Chrome.115.0.5790.99\2c925b57d4892c4fbe177b3d7f91098a3bcdb0d95957c37872a1244bf9edae26
2023-07-21 11:00:09.043 [CORE] Downloading to path: C:\Users\etitt\AppData\Local\Temp\WinGet\Google.Chrome.115.0.5790.99\2c925b57d4892c4fbe177b3d7f91098a3bcdb0d95957c37872a1244bf9edae26
2023-07-21 11:00:09.044 [CORE] DeliveryOptimization downloading from url: https://dl.google.com/dl/chrome/install/googlechromestandaloneenterprise64.msi
2023-07-21 11:00:13.663 [CORE] Download completed.
2023-07-21 11:00:14.593 [CORE] Started applying motw to C:\Users\etitt\AppData\Local\Temp\WinGet\Google.Chrome.115.0.5790.99\2c925b57d4892c4fbe177b3d7f91098a3bcdb0d95957c37872a1244bf9edae26 with zone: 3
2023-07-21 11:00:14.602 [CORE] Finished applying motw
2023-07-21 11:00:14.603 [CLI ] Package hash verification failed. SHA256 in manifest [2c925b57d4892c4fbe177b3d7f91098a3bcdb0d95957c37872a1244bf9edae26] does not match download [aae26a4cf7d92a4c9198d8fac9534670e9fb5f8d1e38897d99b0b51e68107d2a]
2023-07-21 11:00:14.604 [CLI ] Terminating context: 0x8a150011 at D:\a\_work\1\s\external\pkg\src\AppInstallerCLICore\Workflows\DownloadFlow.cpp:15e
2023-07-21 11:00:14.604 [CLI ] Terminating context: 0x8a15002c at D:\a\_work\1\s\external\pkg\src\AppInstallerCLICore\Workflows\InstallFlow.cpp:28a

I bolded the line where things went south. Basically, the hash verification failed because I had already overwritten the old version of the installer with the new version (and the new Chrome version itself, as well). Good thing winget is smart enough to recognize the ground has shifted under its feet. If it finds things it doesn’t expect, it wisely decides to quit what it’s doing. Now I know what I had always suspected. And now, of course, you know too. Cheers!

Facebooklinkedin
Facebooklinkedin

Dev Home Goes Drag’n’drop

With the latest version in the Canary Channel, Windows 11 Dev Home goes drag’n’drop with dashboard widgets. I read a tweet about it from Kayla Cinnamon this morning. And sure enough, once I’d downloaded the latest MS Store updates, it worked as advertised.

Details for Dev Home Goes Drag’n’drop

In this utility, the dashboard is where you can pin widgets. Once that little detail is taken care of, it takes version 0.301.198.0 or higher to exercise the drag’n’drop capability. If you look at the initial lineup in the lead-in screencap you’ll see this widget order: CPU-GPU-Network-Memory. Just for grins the screencap below shows Memory in first position, with the original CPU-GPU-Network order still intact (just shifted one position right).

Dev Home Goes Drag'n'drop.after

To institute the new order, I dragged Memory from the rightmost to the leftmost position. [Click image for full-sized view.]

There’s a Blog Post for That

For all the details about version 0.3, see the July 19 Windows Blogs post entitled “Dev Home Preview 0.3 Release.” In addition to this visible and welcome change, it also mentions various bug fixes and a raft of “Miscellaneous improvements.” There’s also a handy link to the Dev Home docs site that’s worth following. Good stuff, all the way ’round!

Facebooklinkedin
Facebooklinkedin

WinGet Upgrade PowerShell Working

At the end of last month, I blogged about an interesting issue: when you used WinGet to upgrade PowerShell (in PowerShell) that operation would complete, but the screen wouldn’t update properly. As I reported, it showed cancelled and required opening a new PS session to see the current, upgraded version number. No more: now, MS has WinGet upgrade PowerShell working as it should be. See the lead-in graphic for visual proof.

If WinGet Upgrade PowerShell Working, Then What?

No more weirdness in the self-upgrade process, I guess. The lead-in graphic shows that PowerShell updated the initial session window to match the current version (7.3.6) with the version number at the top of the that window. Indeed, I’m forced to *SWEAR* it said 7.3.5 when I started, and appeal to the 2nd line of the WinGet upgrade output because I didn’t think to capture “before” and “after” screencaps. LOL, it didn’t occur to me that the developers would rewrite the terminal window to update the version number. But they did!

I contacted Demitrius Nelon, Team Lead for WinGet at MS to report this weirdness, which he confirmed for me. What he didn’t tell me was that they fixed this in the 7.3.6 release. But its behavior, as shown in the lead-in graphic, speaks for itself. Good stuff and thanks, people: good job.

Got It on Another PC!

I went to upgrade another PC and *DID* capture the initial screen showing 7.3.5 at the top. No more swearing: here’s the screen before the 7.3.6 upgrade completes so you can see the old version number in its top line.

WinGet Upgrade PowerShell Working.X390

See!? There’s the old version number before the 7.3.6 update completes. It’s like magic!

Note added 7/19: looks like this capability (no cancelled and updating version number) may only be in Windows 11. When I updated my sole remaining Windows 10 physical PC this morning, the cancelled message recurred as in my earlier blog post on this subject. Go figure!

Facebooklinkedin
Facebooklinkedin

Canary Build 25905 Gains Upgrade Repair Install

I guess it’s been a long time coming, because MS has waltzed around this topic for two years or more. The latest top-level Insider Preview now includes the option shown in the lead-in graphic. That’s right: Canary Build 25905 gains upgrade repair install capability via WU, built-in. This may make it unnecessary to visit UUPDump to generate ISOs which may then be mounted for such use.

What Canary Build 25905 Gains Upgrade Repair Install Means

Visit Start → Settings → System → Recovery, then look for the item labeled “Fix problems using Windows Update” (as shown in the lead-in graphic). This takes you through a number of screens en route, as shown here:

Canary Build 25905 Gains Upgrade Repair Install.01
First you must grant permission for the repair to start

After you click OK (irrespective of whether or not you allow a timed reboot), you’ll move into Windows Update where you’ll see a display like this one:

Windows downloads and installs a repair version of your OS, before moving into the post-GUI phase.

This can take a while: on my 2018 vintage Lenovo ThinkPad X380 Yoga, it took an astonishingly long 45 minutes to download and install to the first reboot. I was able to keep working until then, but after that, the installer took the desktop away for about another 10 minutes. When it’s time to reboot to continue the repair install you’ll see something like this:

Canary Build 25905 Gains Upgrade Repair Install.restart warning

Once the GUI installer gets done, you will restart to complete repairs.

After the restart warning, it takes another 3 minutes to get to the actual reboot. Then the real post-GUI work begins. All in all it took 55 minutes to get to a desktop as the repair install completed: 45 minutes for download and initial install; 10 more minutes for reboot and post-GUI install.

Trade-offs, Trade-offs

Here’s the deal: it takes about 12 minutes on the same PC to use a mounted ISO to get through the same process. But that means building a current ISO from UUPDump which takes about 25 minutes to complete. Thus it’s a matter of more personal effort to do it manually via UUPDump (37 minutes) for a little less time versus the ease and convenience of letting WU handle it for (but taking 55 minutes to complete). Interesting!

Facebooklinkedin
Facebooklinkedin

Android Subsystem Gets Easy-Peasey

In reading over yesterday’s news, I found Paul Thurrott’s story on GA for the Amazon Appstore on Windows 11. Being both curious and adventurous, I went ahead and installed same on one of my Lenovo test PCs (a beast: the P16 Gen1 Workstation with i9-12950HX, 128 GB RAM, 1.5 TB NVMe SSDs). There’s a little more going on behind the scenes than meets the eye, but things are arranged now so that for Windows 11 Android Subsystem gets easy-peasey. Let me explain…

What Android Subsystem Gets Easy-Peasey Means

Amazon has built its Amazon Appstore as a Windows Store download. If you grab and install it, and the Windows Subsystem for Android is absent on the target PC, the installer first makes sure this underlying environment is up and running. Then it installs itself. The whole process took about 3 minutes on the admittedly over-powered P16 Workstation. But it required no extra effort on my part to get the Amazon Appstore installed and running.

Just for grins, I downloaded and installed Wordle from the Appstore to make sure things were working. It’s been a while since I ran the Android version. I’d forgotten how obnoxious and ad-laden the free version of that app really is. Suffice it to say: NOW I remember!

Android Subsystem Gets Easy-Peasey.wordle

Android apps run in their own self-contained windows on the desktop, inside the WSA (Windows Subsytems for Android) container process as shown in Task Manager at top.

Overall, Amazon has done an excellent job of making the install-to-download-to-desktop process simple, fast and easy. Feel free to give it a try on Windows 11. As far as I can tell it runs on all current versions, production and Insider Preview releases alike. Good stuff!

Facebooklinkedin
Facebooklinkedin